A Definitive Guide To Creating A Rainwater Collection System For Your Tiny House
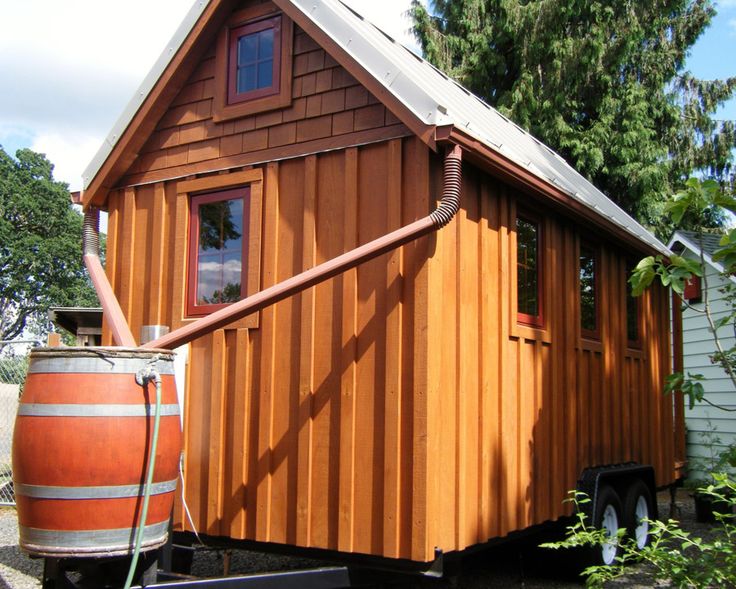
There has been an interesting trend in the housing industry of late, and that trend has become known as the ‘Tiny House Movement’.
Referring to the social movement of people drastically downsizing their living space, the tiny house movement has caught the hearts and minds of people worldwide.
The average tiny house runs between 100-to-400 square feet and can be built in a variety of shapes and sizes.
The most common reasons for downsizing to this extent are financial, environmental, and to simplify life.
What goes hand in hand with the aforementioned reasons for downsizing are the motivating factors behind installing a rainwater collection system for your tiny house.
To follow along with the environmental motivating factor, many tiny-home owners are attempting to live as ‘off the grid’ as possible, which includes installing their own rainwater collection system.
In this guide I will show you how to build 5 super simple DIY Rainwater collection systems quickly, and ridiculously cheap….one for less than $20!
Continue reading to find out everything you need to know about water collection systems!
Table Of Contents
- Understanding Your Water Needs Is Critical To Choosing The Right Catchment System
- Know The Laws Of Water Collection In Your State
- Water Supply VS. Water Demand
- Calculate The Rainfall Your House Can Harvest
- How Much Water Do You Consume In A Day? A Month? A Year?
- What Kind Of Materials Will I Need In Order To Build My Water Collection System?
- Your Geographical Location Has EVERYTHING To Do With Your Water Storage
- Water Filtration Is Absolutely Necessary For Your Water Catchment System
- Do You Really Need Pumps For Your Water Collection System?
- An Extremely Easy Step-By-Step Process To Building Your Water Collection System
- My Top 5 Ridiculously Simple DIY Water Collection Systems
Understanding Your Water Needs is Critical To Choosing The Right Catchment System
Regardless of just how off the grid you are living, everyone needs a basic and reliable water supply.
Rainwater collection in off-grid systems is a way to meet or supplement your water needs, reduce your water-consumption bills, and your drain on the environment.
We need water to drink, to brush our teeth, to wash clothes, and to shower, to name a few.
Do you know biggest problem that most people run into when building their water collection system? They have no clue how much water they consume.
By calculating your water needs prior to building your catchment system, (which i show you how to do below) you will save time and money by choosing the right water collection system.
Know The Laws Of Water Collection In Your State!
 Water collection laws very by state. Sometimes the state considers rainwater state property, prohibiting you from collecting it.
Before moving forward with this project you should contact your health department, or environmentalquality department.
You can also find laws for rainwater collection in your state here.
Water Supply VS. Water Demand
 When it comes to a home’s water consumption, chances are a tiny home will not have the capacity to meet the water needs of the inhabitants year-round.
It does have the capability of, however, is to supplement your water supply, and depending on where you live and the amount of rainfall you receive, the supplementary amounts can be quite impressive and still save large amounts on your bills.
If you live in an area with higher-than-average rainfall amounts, you might be able to harvest enough water to cover your entire consumption needs.
Below, is a way to dial in on the amount of rain you will be able to harvest in a month. This should coincide with the amount of water you use in a month, that way when you build your water catchment system, you know exactly how much water you need to store.
Calculate The Rainfall Your House Can Harvest
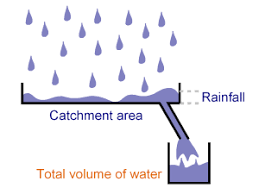 Before fine-tuning your rainwater collection system for your tiny house, you will need to first crunch some numbers to determine exactly how much water your home is capable of harvesting.
The determining formula will need to be done monthly as rainfall amounts vary: catchment area (square feet) x rainfall depth (inches) x 0.623 conversion factor = harvested water (gallons).
How Much Water Do You Consume In A Day? A Month? A Year?
 Next, you will need to calculate your home’s water consumption needs. To do this, you will need to factor in all of the home’s water uses such as drinking, washing hands, toilet flushing, washing clothes, and brushing teeth.
Chances are, you use more water than you think, so you will want your rainwater collection system to harvest as much water as possible to supplement or meet your water-supply needs.
According to the Tiny House Design and Construction Guide, typical water consumption amounts in a tiny home measuring 8 feet by 24 feet would use 15 gallons of water/day, requiring four inches of rainfall/month.
What Kind Of Materials Will I Need In Order To Build My Water Collection System?
If you live in a climate where you get a large portion of the annual rainfall in a few months, you would need a storage system like a cistern, but if your climate has rainfall spread more evenly throughout the year, you would be able to use a smaller storage system, like a trashcan, a 55 gallon drum, or pillow tank.
a cistern is a waterproof receptacle that is used to hold liquids, most commonly water.
a pillow tank, otherwise known as the bladder tank, is a large flexible tank that can store many kinds of liquids. Usually made from PVC, the bladder tank is resistant to abrasions and can even be stored indoors.
Beyond acquiring a storage system, you’ll need a way to run the water to your house.
Small PVC piping is the most common way to get the water from your holding tank to your sinks, and shower.
Below, on our list of 5 DIY water collection systems, you will see that most of the materials beyond the holding tank, and piping, will vary from design to design.
Your Geographical Location Has EVERYTHING To Do With Your Water Storage
Most systems demand some type of rainwater storage, generally provided by a tank. The trouble is in cold climates, those tanks would need to be stored indoors so the water wouldn’t freeze, an obvious challenge in a tiny house.
The rain pillow is made to fit into a home, or outdoors, is easily portable, and can be custom made to suit your space requirements.
The advantage of the rain pillow tank is that it is malleable so can easily be stored underneath a bed, table, trailer, or the home itself.
For higher water consumption needs or larger amounts of rainwater at a time, a tank would meet your water storage needs.
These can be stored above or below ground level, but only in warmer climates where the water freezing will not be an issue.
The other way around making sure your collected water doesn’t freeze during the winter months, is you can build yourself a small heated room for your water tanks.
Now, i know that seems like a ton of work for some measly water collection system, but if you are supplying your water needs for months at a time, it will most certainly be worth it.
Water Filtration Is Absolutely Necessary For Your Water Catchment System
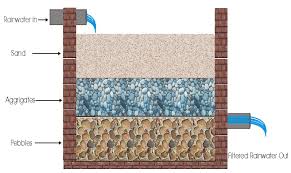 Many people are hesitant to implement their own rainwater collection system as they question the cleanliness of the water.
One thing to remember is that as most cities’ water supplies come from lakes and reservoirs, the amount of fish, animals, and humans that play in those waters most likely make it dirtier than rainwater.
Many rainwater collection systems have a three-fold filtration whereby the water must first pass through three filters, UV light, and a charcoal block before it is drinkable.
Pre- and post-tank water filtration plays a role as a downspout filter package filters out large particles before the roof water even hits the tank.
If you decide to go with a can or a 55 gallon drum, I recommend using a fine screen on the top of your barrel to avoid debris, and those pesky Mosquitos.
Do You Really Need Pumps For Your Water Collection System?
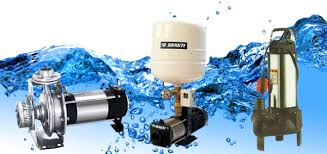 If you want pressure in your lines, you will need to rely on one of two things: gravity or pumps.
If your system cannot rely on gravity alone to get the water flowing through your lines, you will need to install a pump so there is enough pressure to transport the water you need into your home and out the faucets, showerheads, etc.
Pressure tanks are a good option for not having lag when you turn on a faucet as they hold water for instant use.
Pressure-sensitive pumps sense the pressure in the lines and dial it up when there is a drop.
Inline pump controllers are devices separate from the pump that sense the pressure levels in the line and activate the pump when pressure drops beneath a certain level.
If you do intend on adding a water pump to your rainwater collection system, then you should have no problem finding them at your local hardware store, such as Lowes, or Home Depot.
An Extremely Easy Step-By-Step Process To Building Your Own Water Collection System
After reading all the basics about water collection systems, it can be confusing to figure out where to start, so we have broken down the information above, so you have an easy step-by-step process to follow.
- Next you should consider how much water you’ll be able to collect in your area. Water consumption will differ in each household, so the amount of water you collect, or need to have on hand will determine your usage needs. Some states provide more rain than others, so collecting rain for data is a smart first move. Keep in mind that a tiny house sized 8’ x 24’ will generally consume 15 gallons of water per day.
- The first thing to do….find out the state laws where you live for water collection. If you are unable to collect rainwater in your state, then the rest of this process isn’t for you.
- The next step would be finding the right water collection system for your needs. We have put together a list of the top 5 DIY water collection systems below to make it easier on you. Follow the directions listed under each DIY project to build your own.
- After figuring out the water system you intend on using, you’ll need materials. Most of the water collection systems you will see have a large water storage container, followed by PVC piping to run the water to your desired locations. If you are NOT using gravity to feed water to the house, or garden, then you will need to invest in water pumps, which can be bought from any of your local hardware stores.
- Next, add in your water filtration system, if desired. Most filtration units can be installed on the lines running from the tank to the house, or before the water runs into the holding tank. These are typically fine screens to block debris.
After you have completed those steps, sit back, relax, and let the water come to you. Finding out how much it rains, and how much water you need in a year will be a learning experience.
My Top 5 Ridiculously Simple DIY Water Collection Systems
Finding the right water collection system for your needs can be tedious and time consuming.
I have put together a top 5 list to help you find the right plan for you. We tried to get a variety of easy to build, and less expensive ways to build your own water collection system, along with step-by-step directions and videos in order to guide you along the way.
1. The Simple And Effective Garbage Can Rain Barrel
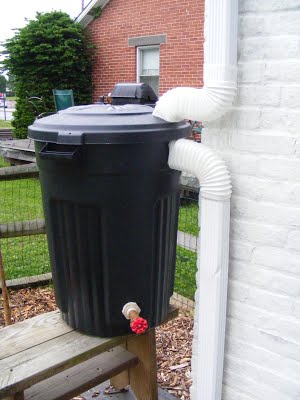 This option is made using a trash can, which is very inexpensive, and quite easy to build for a beginner.
If you are looking to save some money on your collection system, or are working with a tighter budget, then consider this plan to fit your needs.
Beyond being a cheaper option, it seems to have potential when it comes to functionality. Also, it isn’t an eyesore like some of the other water collection systems out there.
This DIY rain collector is going to cost you around 40 dollars. All of the parts and materials you will need can be picked up at your local hardware store.
Materials Needed:
- Trash can with a lid
- 1 bulkhead fitting
- 1 tube of gutter sealant
- 2 downspout extenders (fitted to your downspout size) *we recommend the flexible extenders
Tools Needed:
- Box cutter
- Teflon tape
- Caulking gun
- Pencil
Step 1:
First you’ll want to use your box cutter to cut a square out on the lid of the trash can for your water to flow into the trashcan from your downspout.
The next square hole will be located on the side of the trashcan near the top for any overflow water when the trash can becomes full.
Step 2:
Next step would be cutting your hole for the bulkhead and water drain. Near the bottom of the trashcan you want to cut a round hole big enough for the bulkhead to go through (about 3 to 4 inches above the bottom of the trash can.)
Next use your Seamer Mate caulking to adhere the bulkhead to the inside of your trashcan so that you ensure that the water stays in your can.
After the bulkhead is attached and dry, screw your drain fitting into the bulkhead on the outside of the can.
Step 3:
After you have your drain in place, finding a spot for your rain water collector is next.
We recommend that you place your trash can rain water collected near the roof downspout, so that you don’t need to run your flexible adapter very far.
Snap in the flexible adapter to fit your downspout, then place the other flexible downspout adapter in the side cut hole for your overflow.
Once you have completed all of these steps, sit back, relax, and collect the rain water.
Side note* it is always recommended to keep your rain collector elevated to maintain a dry area, and to add water pressure.
2. The Handyman Rain Collector
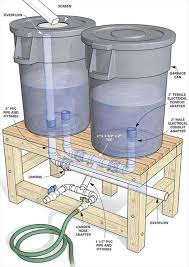 This design utilizes garbage cans as the holding containers, keeping the cost down, and making installation easy.
This water collection system will cost you less than 100 dollars, and will work just as well as the more expensive catchment systems you can purchase.
Tools Needed:
- Cordless drill
- 2-1/4 inch Hole Saw
Materials Needed:
- Silicone Caulking
- Union Valves and Reducers
- Threaded PVC Coupler
- Screen
- Glue
- 2 inch PVC Pipe
- 55 Gallon Barrel or Trashcans (with lid)
- 2 inch Male Threaded Conduit Adapter (gray PVC)
- 2 inch Female Threaded Conduit Adapter (gray PVC)
Step 1:
The first thing you’ll want to do is acquire a 55 gallon drum or some trashcans with lids. You can usually find them online for cheap.
55 Gallon Rain Barrel on Amazon
Another way to get a container at low cost is to visit car washes or food plants. They will often give you their unused barrels for free or at a lower cost than buying brand new.
After you have your water collection container, you’ll want to visit your local hardware or plumbing store to pick ump the needed plumbing parts. This will cost you around 40 dollars.
Find a good location for your rain barrels. It is best to place the rain barrels underneath a downspout so you have a short distance from the roof gutters to your rain barrels.
Step 2:
Drill a hole about 4 inches up from the bottom for your spigot fitting. Keep in mind that if you want more water pressure for a sprayer novel, you’ll need to elevate your barrels to maintain good water pressure.
if you plan on building a platform, make sure it is treated lumber and heavy duty. If you are using a 55 gallon drum, it can weigh around 440 pounds full of water.
Step 3:
Next is cutting holes in the bottom of your barrel using the 2-1/4 inch hole saw. Next, screw your 2 inch male threaded conduit adapter. Using an electrical adapter is recommended since they aren’t tapered like plumbing adapters, that way you can tighten them all the way.
Add a bead of silicon caulk around the opening and screw on the threaded electrical coupler to cinch the rain barrel in-between the two fittings.
Step 4:
Glue your sections of 2 inch PVC pipe, reducers, valves, and unions together. This will make disassembly easier if you need to take it down during the winter months.
This would also be a good time to add in an overflow pipe, that way you can direct the overflow water to a garden.
Step 5 :
Your final step is going to be cutting your hole in the top of the barrel. You will want to put a screen on top of your hole, that way debris like leaves or bugs wont get into your water supply.
After you have completed all of these steps, just sit back and wait for the next big rain.
3. The Large Water Catchment System (1,100 gallons)
If you go through more water than most, or just want a large collection of water on hand, this may be the right water collection system for you.
This plan involves 4 large metal water containers hooked together by piping, and stacked on top of each other.
This may seem like a daunting task, or a bit out of your skill zone, but don’t be scared. The directions given in this video are super easy to follow, and will have you collecting rainwater in no time!
If you are interested in building this water collection system, then take a look at this video to find out if it’s right for you!
4. The $15 Rainwater Catcher
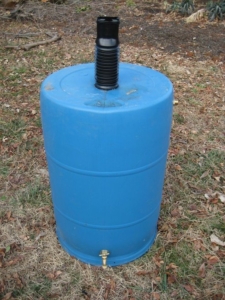 This design is a true DIY water collection system, mostly because it is extremely cheap, and works like a charm.
This directions show you where to get all of your materials at low cost, and provide you with step-by-step instructions so you can have your water collector built in no time!
After this DIY project is complete, you’ll have yourself a perfectly functional rainwater barrel that didn’t break the bank, or your back.
Step 1: The Rain Barrel
The first to do for this DIY Project, is to find yourself a rain barrel. The one used in this project is a standard 55 gallon drum.
It has two large threaded plugs on the lid, and is typically the easiest and cheapest form of rain drum you can find. They are typically found for around $10.00
There are a few options you can pick through to find a barrel for super cheap, or even free. You can find them on Craigslist, at car washes, food distributors or bottlers, or a vineyard near you, if you are looking for something a little fancier.
Step 2: The Tools
- Adjustable Wrench
- Caulk (Silicone)
- Hole Saw (4 inch)
- Forstner Bit (1 inch)
- Screw Driver
(You may need a barrel plug wrench) if you don’t have one a screw driver and hammer will work for the barrel plugs - Drill
Step 3: Your Materials
- Flexible Downspout Adaptor ( sizing will vary depending on your downspout size)
- 1 inch Metal Washer
- 3/4 inch Hose Bib
- Brass Adapter ( 3/4 inch MHT x 3/4 inch MIP x 1/2 inch MP)
- 90 degree Elbow ( 3/4 inch)
You can find all of these items at your local hardware store, and sometimes will be cheaper when buying in bulk, if you consider making multiple rain barrels.
Step 4: Drilling Holes
You will have to drill three different holes in your rain barrel. The first hole will be for your drain spout at the bottom of the barrel facing outwards. You’ll want to drill the hole inline with the barrel plug hole so that it is easier to connect your 90 degree spigot onto the barrel (Use the 1 inch forstner bit)
The second hole will be at the top of the barrel on the outside for any overflow that you may experience when your rain barrel gets full. Using the same 1 inch bit, drill your overflow hole about 4 inches down from the top of your rain barrel.
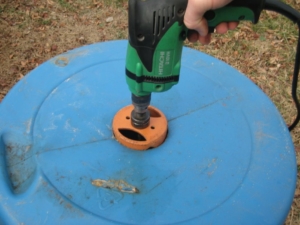
The third and final hole will be for the downspout to connect to the top of the barrel, where your rainwater will flow into the rain barrel. Switch your drill bit to the 4 inch hole saw, and drill your hole towards the back of the barrel. You can place the 4 inch hole anywhere on top to fit your esthetic needs.
Step 5: Overflow Adaptor
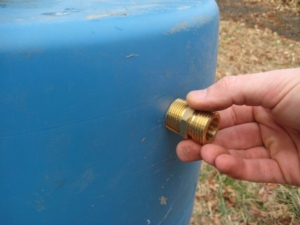
Next you’ll want to screw your brass adaptor into the 1 inch hole you drilled for your overflow. Make sure that you are screwing in the threaded end, not the garden hose end. Also you may want to use teflon tape on the threads to make sure you have a good seal.
Step 6: Caulking
Next you’ll want to take your metal washer and caulk with silicon around the metal washer. Place the silicon caulked side against the barrel over your 1 inch spigot hole.
Step 7: Attaching The Spigot
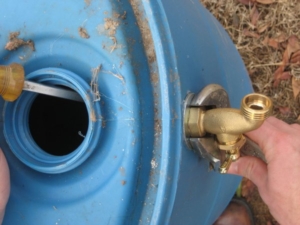 This step may seem more difficult than it actually is. First you’ll want to take your 90 degree elbow fitting and place the female end over your finger.
Next go in through the plug hole on the barrel and place the threaded end through the 1 inch hole you cut for your spigot drain.
Place the metal washer over the threaded part of the 90 degree fitting on the outside of the barrel and stick to the outside of the barrel.
When the threads are exposed to the outside of the barrel, screw on your spigot to the threads of your 90 degree fitting. Hand tighten at first.
After you have your fitting tight by hand, use your long screw driver to go in through the top of the barrel, place the screw driver into the female end of the 90 degree fitting, and tighten the outside spigot with your open ended wrench.
Step 8: Pop In Your Downspout Adaptor
Next is simple. The 4 inch hole you drilled with your hole say should be perfect for you to pop in the adaptor that is going to attach to your downspout.
Step 9: Finish The Project
You’ll want to build your barrel up off the ground. We recommend you level out an area below your downspout, cover in gravel for drainage, and place leveled concrete blocks or slabs for a solid base.
After you have completed all of these steps, you have a functional rain collector, that was cheap and quick to build!
5. The Classic Rain Barrel Collection System
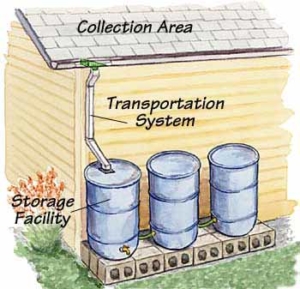 I like to think that this is one of the more popular designs for catching rainwater. It utilizes the roof and gutters of your house to collect the water, so it can be stored in rain barrels below for watering your garden.
Water collection
The roof and gutters are going to be the main source of catching water. A 40 foot by 25 foot roof will divert close to 600 gallons of water per hour, with an inch of rainfall. If you have two downspouts off of your roof, you could easily collect 300 gallons of water from each.
Draining In To Barrels
This part is very important, mostly because its carrying the water to your barrels.
The downspouts of your gutters are the easiest way to transport the water from the roof to your rain barrels.
If you don’t want to use your already installed downspouts, you can make your own from either aluminum or plastic, and tie it into the gutter system.
The size of your downspouts plays a big role in carrying the water to your rain barrel. If you have 5 inch gutters, you’ll want to use the 3 inch downspout. If you have 6 inch gutters, you’ll use 4 inch downspout.
The next, and most important part of building this design, is making sure you have a filtration device at the top of your downspout. The easiest way to filter out debris is to place a fine screen in the gutter, at the top of your downspout.
Storage
There are many different ways to store your collected rain. In this design they use three 55 gallon drums, which can be purchased here.
Placement
The placement of your water barrels should be thought out. We recommend placing them close to your garden, and directly underneath a downspout.
You’ll want to dig down about 4 inches the length and width of your chosen concrete block base.
Next you will want to fill that space with gravel, we recommend pea gravel, considering it is much easier to level your blocks on, and it provides excellent drainage to keep your base dry.
The higher off the ground the better. This also makes it easier to access your spigot, or even get a watering can underneath it.
Storage Capacity
This is built with 55 gallon drums, and is designed to hold 165 gallons of water using three barrels.
This can always be modified or personal preference. You don’t have to use 3 barrels, or you could use more than 3.
The barrels can be easily connected together using hose, or PVC piping to add to your storage amount.
Building Your Rain Barrel Water Collection System
Materials Needed:
- 1 55 gallon drum, or a garbage can
- 4 concrete slabs or blocks
- 1 downspout elbow *S shape*
- Window screen (preferably aluminum)
- A standard hose spigot (1 inch with 3/4 inch threads)
- Metal washers (4)
- Teflon tape
- 1 tube of caulk
- Bushing (1 3/4 inch x 3/4 inch)
- Coupling (1 3/4 inch x 3/4 inch)
- Lock nuts (1 3/4 inch)
- Pipe thread (1 3/4 inch) with 1 inch adapter for a hose
The Tools You Need:
- Screwdriver
- Hacksaw
- Drill
- Rivet Gun and Rivets
- Ruler
- Pencil
- Spade
- Adjustable Wrench
- Level
The first thing you should do is clean the inside of your chosen barrel with soap and water to remove any factory residue, or outside gunk if you didn’t buy a brand new barrel.
Next level the area with your spade where you intend on building your water collector. Keep in mind the position that the downspout will be in, before you place your slabs down to level.
After that place your gravel down along with your concrete blocks. Level the concrete blocks.
Next, after you have measured the position in which you’ll need to cut the downspout to apply the S elbow, use the hacksaw to carefully cut the downspout. About 2 inches below the original mark of the top of the barrel on the downspout.
Connect the S Elbow to the downspout with your pop rivets and rivet gun.
The next step would be to drill a 3/4 inch hole in the side wall of the barrel. You should allow enough room below for a bucket to get underneath the spigot.
Squeeze caulk on both sides around the hole. Next connect the spigot and coupling together. Make sure that you use teflon tape in order to get a strong and water sealed bond.
Place the threaded end through your drilled hole, place a metal washer around the inserted piece on the inside of the barrel, then fasten and tighten with a bushing.
To run water from one barrel to the next, repeat the process of putting another spigot on the barrel. Connect a hose adapter to both barrels, and connect together with a small garden hose.
If you have a barrel with a lid, you’ll then cut your hole where the downspout will pour water into the barrel.
Make sure to place a screen over the hole on the barrel to keep bugs like mosquitos out. You can also add a screen to the top of the downspout in the gutter, to avoid debris like leaves from getting into your downspout.
After you’ve completed your DIY rain collector, just wait for rain!
Summary
As the tiny house movement gains in popularity, it gives rise to the development of systems that enable people to live as off the grid as possible, furthering their goal towards decreasing their carbon footprint.
Accurately calculating the amount of rain water your home is capable of harvesting, as well as your home’s water consumption needs, will overcome the challenges of harvesting rainwater from small properties.
Integrating a rainwater collection system for your tiny house is an excellent way to embrace the underlying philosophy of the movement: reducing consumerism, living simply, embracing an eco-friendly lifestyle, and more affordable living.





Leave A Comment